To add:
- perspective correct interpolation
- reflection models in the fragment shader
General things
- Programmable pipeline just means that you can write your own shaders
General rendering pipeline
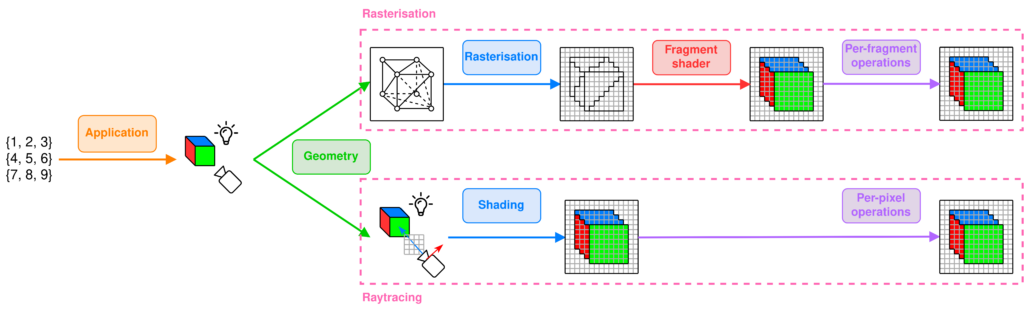
Application Stage
What does the input represent ?
Derive the geometry to render and its specificity according to user’s input
- Scene setup: translates user input to scene setup: placement of objects, camera, lighting, textures, materials, lighting model, …
- Physics simulation: calculate object movement, collisions, interactions, … and update object positions and orientations based on these
- Animation: update positions and properties of objects over time
- User input handling: process inputs from keyboard, mouse, and modify the scene accordingly
Geometry Stage (Vertex shader)
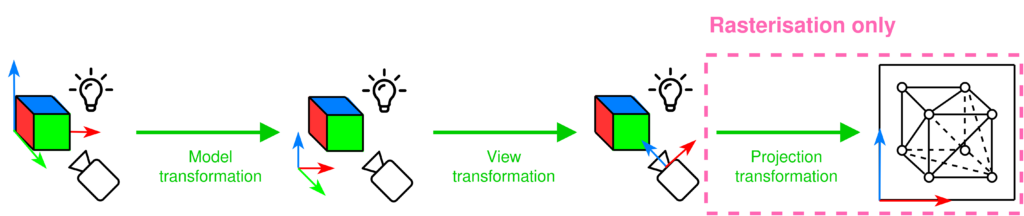
What does the camera see?
Move to camera’s perspective
- Model transformation: transform vertices of the object from its local coordinate space, object coordinates, to the world coordinates
- View transformation: transform world coordinates to camera coordinates, simulates the camera’s position and orientation in the scene
- Primitive assembly / Tesselation: vertices assembled into geometric primitives. We want to do that before the upcoming expensive operations so that geometry is optimised for ray/triangle intersection testing in ray tracing and edge function testing in rasterisation
- Frustum clipping: ONLY FOR RASTERISATION check whether the vertices are in the view frustum of the camera, rasterisation does not care for vertices outside of the view frustum
- Projection tranformation: ONLY FOR RASTERISATION transform the 3D coordinates into a 2D screen space (orthographic or perspective projection)
In real time rendering: implement level of detail (LOD), backface culling and occlusion culling to optimise this stage (more on real-time vs offline rendering).
Rasterisation steps
Rasterisation
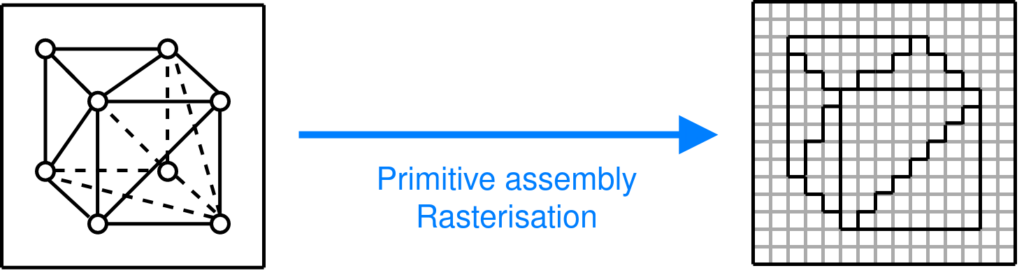
Where are the vertices on the screen?
Determine the pixels that a given primitive covers on the screen
Triangles are converted into pixel fragments, each fragment represents a potential pixel and contains info like depth, colour and texture coordinates
Fragment ≠ pixel: a fragment can store colour, position, depth, texture coordinates, …
Fragment shader
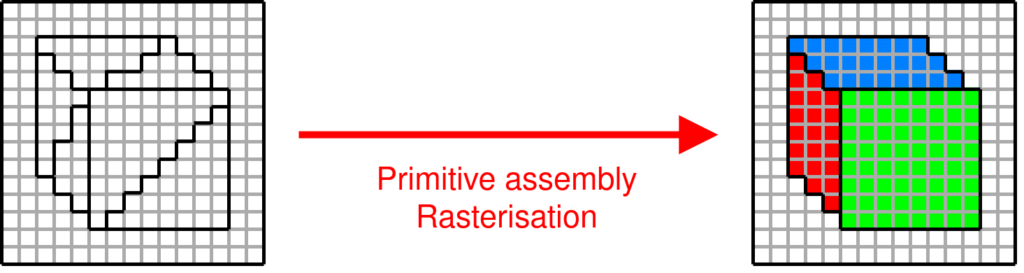
What colour is each pixel?
Compute the expected colour of each pixel that is covered by a primitive
- Fragment shader gets interpolated data from vertex shader: texture coordinates, normal vector, world position, vertex colour. Interpolated per fragment using barycentric coordinates based on the triangle
- Lighting effects computed based on surface properties (normal, position) and light properties (direction, colour, intensity) using a lighting model (Lambertian diffuse, Blinn-Phong specular, …) -> gives you light intensity at that pixel
- Texture sampling: use the interpolated UV coordinates to sample a colour from the texture
- Shadow mapping: render the scene depth-only from the light’s point of view (shadow pass), store depth values (distances from the light) in a shadow map that represents the closest surface each light ray hits. During the main pass, transform each fragment’s world position into light space (same projection as used in the shadow pass) and compare its depth with the depth stored in the shadow map to know whether it’s exposed to this light or not
Per-fragment operations
Which pixels are visible?
Determines how a fragment is finally drawn on the screen
- Depth testing (z-buffer): each pixel has a depth value stored in a buffer, when a new fragment is processed, its depth is compared to the existing depth value, if the new fragment is closer to the camera, it replaces the old fragment, otherwise it’s discarded
- Alpha blending: if the fragment shader outputs an alpha value, blend the fragment’s colour with the existing colour in the framebuffer based on alpha value (transparency effect)
- Stencil testing: like putting a mask on the rendered image, cover parts of the screen so that only certain pixels are drawn or updated
- Uses cases can be portal rendering, specific effects (you want to draw a character behind a wall with a keyhole, the keyhole is drawn into the stencil buffer) or you want to outline objects
- Anti-aliasing: smooth out the jagged edges of primitives
Raytracing steps
Application stage update
- Acceleration structure building: important for raytracing
Ray casting and shading
What colour is each pixel?
Cast rays into the scene and shade the intersection points
- For each pixel, cast a primary ray from the camera through the scene
- At found intersection point between this ray and an object, shade it: compute the colour of the intersection point using lighting models
- Global Illumination: Ray tracing can handle more complex lighting effects like shadows, reflections, refractions, and indirect lighting by casting secondary rays:
- Shadow Rays: Cast from the intersection point to light sources to determine whether the point is in shadow.
- Reflection Rays: For reflective surfaces, cast a ray in the direction of reflection and compute the color by checking what the reflected ray hits.
- Refraction Rays: For transparent materials, cast rays through the object based on Snell’s law and compute the color from what’s behind it.
- Local illumination: only consider direct light from light sources, no interaction between objects
- Phong
- Blinn-Phong
- Global Illumination: Ray tracing can handle more complex lighting effects like shadows, reflections, refractions, and indirect lighting by casting secondary rays:
Per-pixel operations
Which pixels are visible?
Determines how a fragment is finally drawn on the screen
- No need for depth Testing (Z-buffer) here: In ray tracing, depth testing happens naturally because rays return the closest intersection point. You do not need to explicitly compare depths as in rasterization, since each ray directly determines the visible surface.
- Alpha blending: this is handled naturally by tracing rays through transparent materials, blending the colors of objects behind them.
- Anti-Aliasing is done implicitely in the shading stage, often handled through super-sampling, where multiple rays per pixel are cast and averaged to produce smooth edges and reduce jaggedness.
Frame buffer operations
Very last step, done after the per-fragment/pixel operations.
- Double buffering: rendering is done in an off-screen buffer (back buffer) while the previous frame is displayed on the screen (front buffer). Once rendering is complete, the buffers are swapped.
- Final output: contents of the framebuffer (after all per-fragment operations) are sent to the display for viewing.